92. Fundamentals of DNA Sequencing: Gene Libraries and Chain Termination
Have you ever wondered how scientists decode the precise instructions that build and maintain a living organism? The secret lies in reading the genetic code, letter by letter. This slide deck explores the fundamental techniques used to isolate specific genes and determine their exact nucleotide order. For students entering the medical and biochemical fields, mastering these techniques is not just an academic exercise; it is the foundation for understanding genetic diseases, developing targeted therapies, and unlocking the mysteries of life itself.
Slide 1. Fundamentals of DNA Sequencing
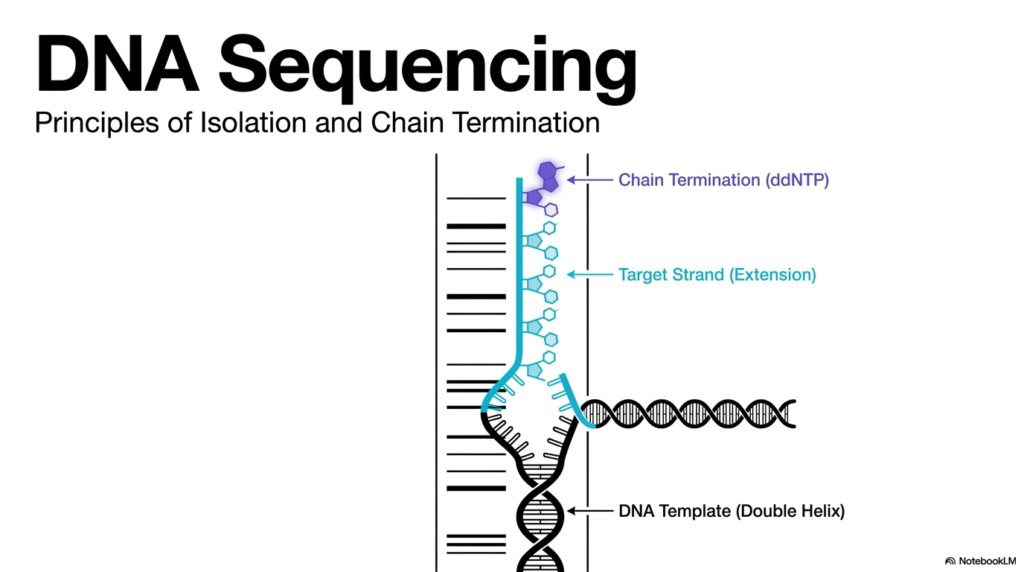
The first slide introduces the foundational principles of DNA Sequencing, offering a high-level view of how scientists peer into the genetic code. At its core, the illustration depicts a DNA template, specifically a double helix, which serves as the original biological blueprint. In any sequencing endeavor, one must first isolate a target strand that acts as the template for creating a complementary copy. This extension phase is where the magic of molecular biology begins to unfold, revealing the precise sequence of bases.
To achieve successful DNA Sequencing, scientists employ a clever biochemical manipulation known as chain termination. The diagram highlights a growing target strand in bright blue, built block by block. However, the process relies on the intentional interruption of this growth using a modified molecule called a dideoxynucleoside triphosphate, or ddNTP. When this specialized molecule incorporates into the expanding chain, depicted in the diagram as the purple structure, it immediately halts any further extension. This sudden stop is not an error but a highly controlled step in the procedure.
Understanding this termination event is absolutely crucial for mastering DNA Sequencing methodologies. The illustration elegantly shows how the template strand guides the assembly of the new strand through strict base-pairing rules. Yet, by introducing the terminating molecule, researchers force the cellular machinery to produce fragments of varying lengths. This interplay between normal strand extension and forced termination forms the absolute basis of modern genetic analysis. It allows scientists to decipher the exact order of nucleotides in a given genetic fragment.
For biochemistry students, this visual serves as a critical starting point. It breaks down the overarching concept into two primary domains: the initial isolation of the target genetic material and the subsequent application of the chain termination method. By grasping how standard building blocks interact with these unique terminating molecules, one can fully appreciate the elegance of these biochemical techniques. The upcoming slides will delve deeper into each of these molecular mechanisms.
Slide 2. A Two-Part Approach to DNA Sequencing
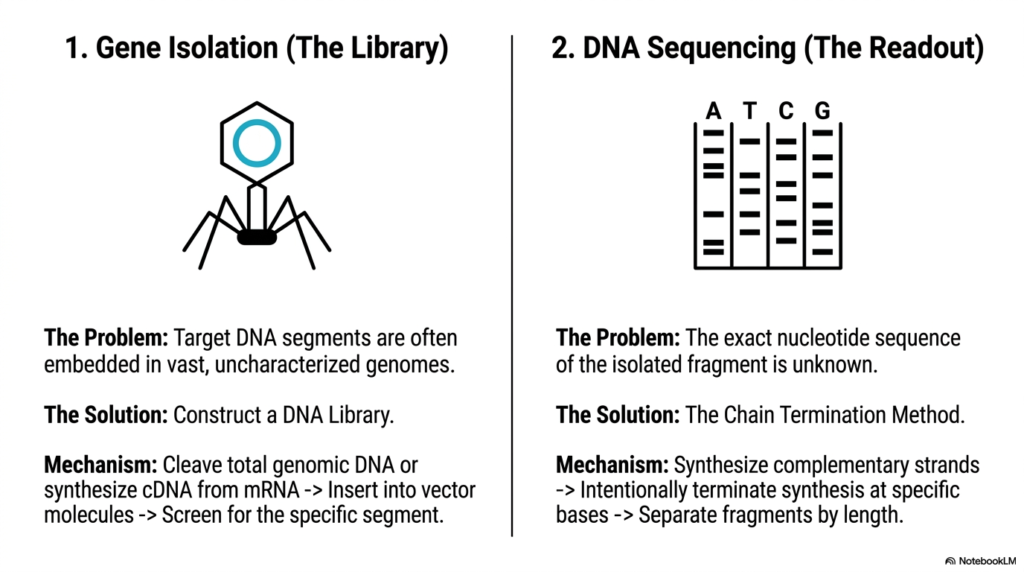
This slide presents the overarching strategy required before any actual DNA Sequencing can occur. It divides the complex workflow into two distinct but interconnected phases: Gene Isolation and the Sequencing Readout. The left panel outlines the initial hurdle researchers face. Target genetic segments rarely exist in isolation; instead, they are buried deep within vast, incredibly complex genomes. To study a specific gene, scientists must first find a way to extract and amplify it from this uncharacterized background material.
The solution to this isolation problem is the construction of a DNA library, heavily utilizing bacteriophages, as shown by the viral structure on the slide. Researchers cleave the total genomic material and insert these smaller fragments into vector molecules. By screening this extensive collection, they can successfully isolate the specific segment of interest. This preparatory phase is absolutely essential, as attempting to analyze a massive, complete genome all at once using traditional methods would be practically impossible.
Moving to the right panel, the slide transitions to the actual mechanics of DNA Sequencing. Once the gene is isolated, its exact nucleotide order remains a mystery. The readout phase utilizes the celebrated chain termination method to solve this problem. The illustration provides a simplified view of a gel electrophoresis result, showing distinct bands corresponding to the four nucleotide bases: adenine, thymine, cytosine, and guanine. This visual represents the ultimate goal of the entire procedure.
The mechanism described involves synthesizing complementary strands from the isolated template. By intentionally terminating this synthesis at specific bases, researchers create a pool of fragments of varying lengths. When these fragments undergo separation based on their size, the underlying genetic code finally reveals itself. Mastering both the isolation phase and the readout phase is essential for anyone seeking a comprehensive understanding of DNA Sequencing technologies and their applications in modern biomedical research.
Slide 3. Creating Libraries for DNA Sequencing
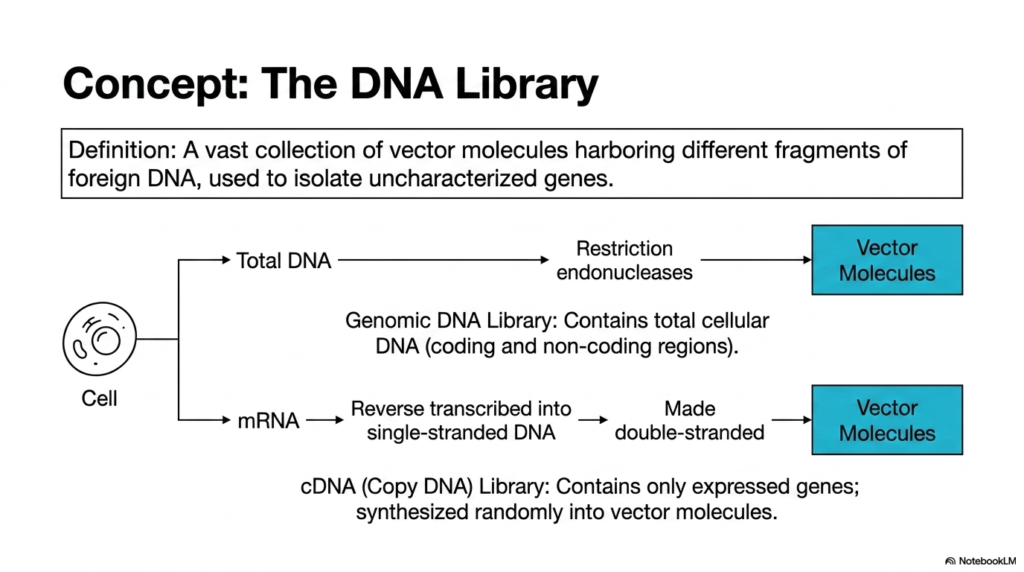
Before engaging in direct DNA Sequencing, scientists must master the concept of the DNA library, which is the central focus of the third slide. The presentation defines this library as a vast, comprehensive collection of vector molecules. Each vector harbors a different fragment of foreign genetic material. This organizational system is critical for isolating uncharacterized genes from a cell. The flowchart elegantly visualizes the two primary pathways for constructing these genetic libraries, starting from the total cellular material.
The first pathway details the creation of a Genomic DNA Library. This approach takes the total DNA from a cell and uses specialized enzymes, known as restriction endonucleases, to cut the massive strands into manageable pieces. These fragments are then incorporated into vector molecules. A genomic library is incredibly comprehensive, containing both the coding regions that instruct protein synthesis and the non-coding regions that regulate cellular functions. This complete biological snapshot is vital for extensive DNA Sequencing projects.
Alternatively, the slide illustrates the construction of a cDNA, or complementary DNA, library. This process begins not with total genetic material, but with messenger RNA. Through the action of an enzyme called reverse transcriptase, this mRNA is converted into single-stranded DNA, which is subsequently made double-stranded and inserted into vectors. Unlike its genomic counterpart, a cDNA library only contains the actively expressed genes of a cell at a specific moment in time.
Understanding the distinction between these two library types is a fundamental requirement for mastering DNA Sequencing preparation. A genomic library provides the entire architectural blueprint, while a cDNA library offers a focused look at the active construction projects within the cell. By choosing the appropriate library construction method, researchers can effectively streamline their workflow and target the precise genetic elements necessary for their specific medical or biological inquiries.
Slide 4. Vectors in DNA Sequencing
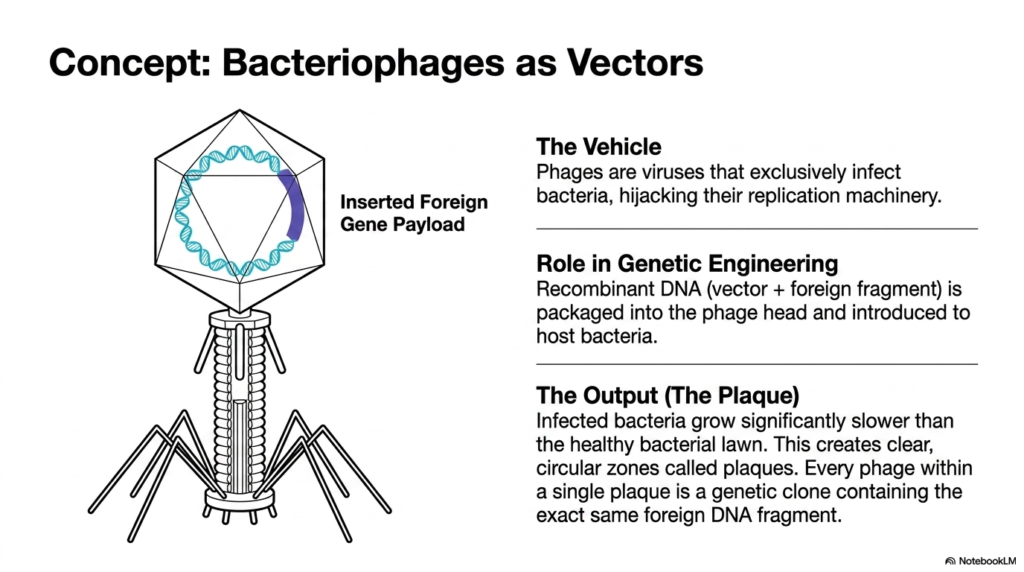
The fourth slide introduces a critical tool used in the preparatory phases of DNA Sequencing: the bacteriophage vector. The detailed illustration depicts this remarkable biological vehicle, which is a specialized virus naturally evolved to exclusively infect bacterial cells. In the realm of genetic engineering, researchers skillfully hijack this natural infection machinery to their advantage. The diagram clearly highlights the geometric head of the phage, which has been biochemically modified to contain an inserted foreign gene payload, forming a highly efficient recombinant molecule.
This recombinant structure, combining the viral vector with the foreign genetic fragment, is essential for amplifying the target material. Once the bacteriophage infects a host bacterium, it introduces this genetic payload. The infected bacteria then begin to replicate the viral structures along with the inserted sequence. This process effectively turns the bacterial culture into a biological factory, producing countless copies of the specific segment needed for subsequent DNA Sequencing analysis.
The final section of the slide explains the observable output of this intricate process, known as plaque formation. As the infected bacteria devote their internal resources to viral replication, they grow significantly slower than the surrounding healthy bacterial lawn. This differential growth creates distinct, clear circular zones on the culture plate called plaques. These clearings are not just empty spaces; they represent highly concentrated areas of cloned genetic material ready for harvest.
Crucially, every single phage within a specific plaque represents a perfect genetic clone, containing the exact same foreign fragment. This clonal purity is an absolute prerequisite for accurate DNA Sequencing procedures. By isolating the viruses from a single plaque, researchers guarantee that they are working with a uniform population of target molecules. Understanding this biological amplification mechanism is vital for biochemistry students studying how complex, tangled genomes are broken down, organized, and prepared for detailed biochemical analysis in the laboratory.
Slide 5. Screening for DNA Sequencing
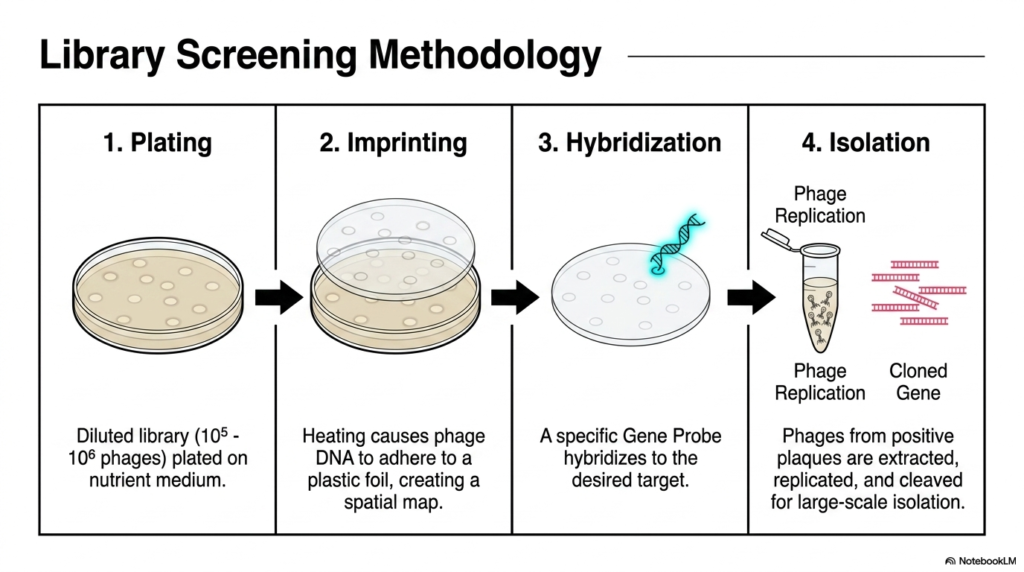
Slide five outlines the meticulous library screening methodology, a four-step process that builds upon the foundational concepts of the previous slides. Before researchers can begin the final steps of DNA Sequencing, they must locate their specific gene of interest within the vast phage library. The first step, plating, involves distributing a highly diluted solution containing hundreds of thousands of phages onto a nutrient medium. This allows individual plaques to form across the surface of the culture dish.
Following the initial plating, the process moves to imprinting. Researchers apply a special plastic foil over the culture dish. Applying heat causes the viral genetic material from the plaques to permanently adhere to the foil. This brilliant technique creates a precise spatial map of the entire library on a durable membrane. The original bacterial plate remains intact, while the foil carries a mirrored copy of the genetic information, ready for the next crucial biochemical intervention.
The third stage is hybridization, a cornerstone technique in preparing for DNA Sequencing. Here, a specifically designed gene probe is introduced to the foil imprint. This probe is engineered to recognize and bind only to the desired target sequence. When the probe finds its match, it hybridizes, emitting a detectable signal, often visualized as a glowing spot on the slide. This allows scientists to pinpoint the exact spatial location of the gene they wish to study.
The final step is isolation. By comparing the glowing spots on the hybridized foil back to the original culture plate, researchers can identify the exact positive plaques. The phages from these specific locations are extracted, allowed to replicate further, and ultimately cleaved to release large quantities of the cloned gene. This elaborate screening process guarantees that the subsequent DNA Sequencing reactions are performed on a pure, highly concentrated sample of the correct target material.
Slide 6. Probes in DNA Sequencing
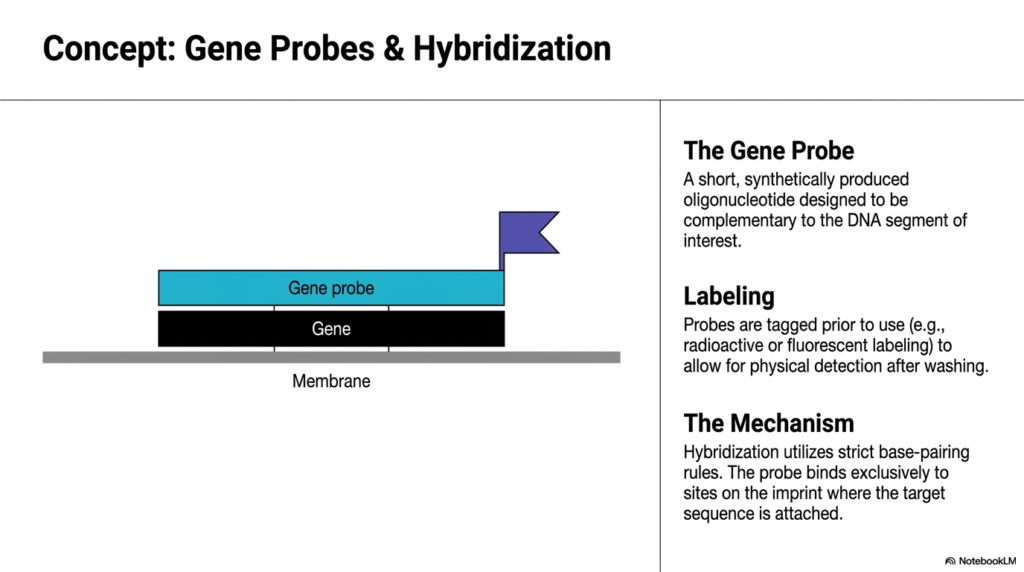
Slide six takes a closer look at the biochemical nature of gene probes and the mechanism of hybridization, which were introduced in the previous screening phase. These tools are absolutely vital for modern DNA Sequencing workflows. The illustration presents a highly magnified view of a gene probe successfully binding to its target genetic sequence, which is firmly attached to a solid membrane. This simple yet profound interaction allows scientists to find a needle in a genomic haystack.
The text defines the gene probe as a short, synthetically produced oligonucleotide. Researchers specifically design these artificial sequences to be perfectly complementary to the unique segment of interest they are trying to isolate. This means the probe acts as a molecular homing beacon. However, simply binding to the target is not enough; researchers must be able to detect this binding event. Therefore, prior to use, these probes undergo a labeling process.
As noted on the slide, the labeling typically involves tagging the synthetic oligonucleotide with either radioactive isotopes or fluorescent markers. This physical tag is represented in the diagram by a flag attached to the probe. During the actual hybridization step, the laboratory washes the membrane with a solution containing these labeled molecules. After a period of incubation and subsequent washing to remove unbound molecules, the remaining radioactive or fluorescent signals reveal the exact location of the target.
The entire mechanism relies entirely on strict biochemical base-pairing rules. The probe will only hybridize exclusively to sites on the imprint where the exact complementary sequence exists. Understanding this high-fidelity binding is crucial for students learning about DNA Sequencing. Without the extreme specificity provided by these designed probes, identifying and isolating the correct genetic fragments from a massive, complex library for final DNA Sequencing readout would be a completely impossible task.
Slide 7. Templates for DNA Sequencing
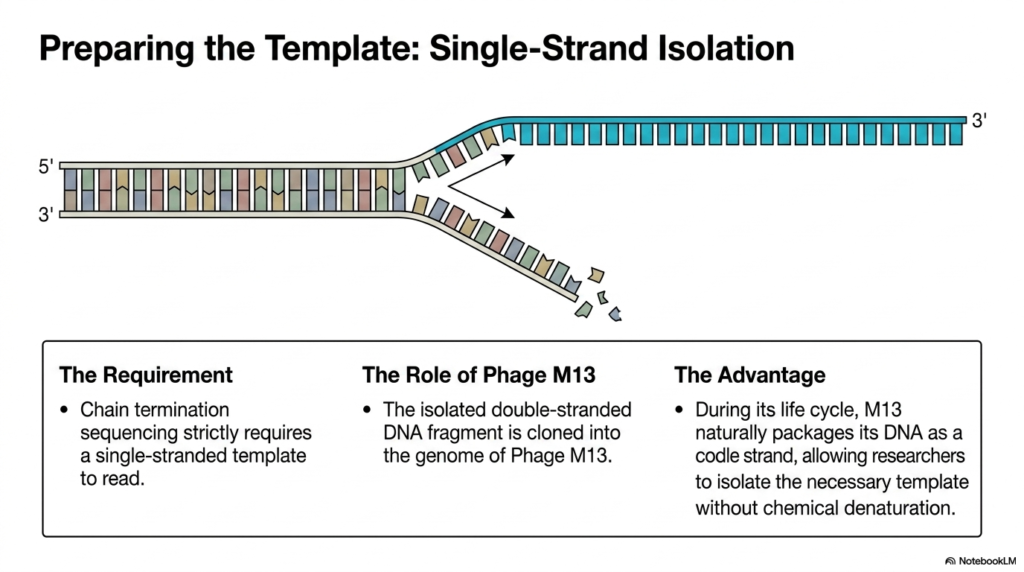
The seventh slide addresses a strict biochemical requirement for the chain termination method of DNA Sequencing: the absolute necessity of a single-stranded template. The diagram illustrates a standard double-stranded molecule being unwound and separated into individual strands. The fundamental chemistry of the sequencing reaction relies on synthesizing a new, complementary strand along an exposed template. If the target material remains tightly bound in its standard double helix configuration, the essential enzymes cannot access the genetic code to read it.
To overcome this significant obstacle, molecular biologists employ specialized tools, prominently featuring the bacteriophage M13. As detailed on the slide, the isolated double-stranded genetic fragment of interest is first cloned directly into the genome of this specific phage. Phage M13 possesses a highly unique life cycle that makes it an invaluable asset in the laboratory. It naturally solves the double-strand problem without the need for harsh chemical treatments or excessive heat denaturation processes.
The key advantage of utilizing Phage M13 lies in its natural packaging mechanism. During its life cycle, this specific virus naturally packages its genetic material as a single, continuous strand. By inserting the target segment into the M13 genome, researchers trick the biological system into producing and exporting the exact single-stranded template required for the reading phase. This elegant biological solution preserves the integrity of the molecule while preparing it for analysis.
Understanding this intricate template preparation phase is a fundamental and vital component of mastering traditional DNA Sequencing techniques. Students must recognize that biochemical reactions require highly precise physical conformations to proceed correctly in a laboratory setting. By successfully leveraging the natural biology of Phage M13, researchers seamlessly obtain pristine, fully accessible templates. This careful preparation guarantees that the highly sensitive polymerase enzymes used in the subsequent DNA Sequencing steps can operate efficiently, ensuring accurate and reliable determination of the final nucleotide order.
Slide 8. Initiating DNA Sequencing
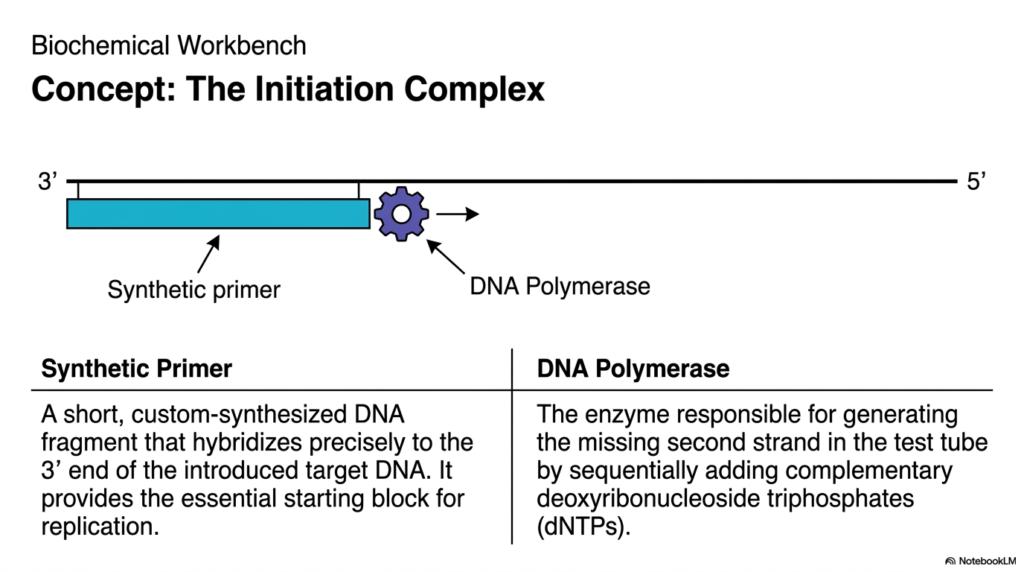
Slide eight brings us directly to the biochemical workbench, illustrating the formation of the initiation complex. This structure represents the precise starting point for the chemical reactions that drive DNA Sequencing. The diagram presents a clear, simplified view of a long, single-stranded template molecule, oriented from the 3-prime to the 5-prime direction. Attached to this template is a much shorter, brightly colored segment labeled as the synthetic primer, with a gear-like structure representing the crucial DNA polymerase enzyme.
The synthetic primer is a fundamental requirement for the process. As the text explains, this is a short, custom-synthesized fragment designed to hybridize precisely to the 3-prime end of the target molecule. Polymerase enzymes are biologically incapable of initiating the synthesis of a new strand from scratch; they absolutely require an existing piece of material to build upon. The synthetic primer fulfills this role, providing the essential starting block and a free chemical group for the enzyme to attach the next building block.
Once the primer is securely annealed to the template, the DNA polymerase takes its position, forming the complete initiation complex. This enzyme is the biological engine of the DNA Sequencing process. Its primary responsibility is to generate the missing second strand within the controlled environment of a test tube. It achieves this by moving along the template and sequentially adding complementary standard building blocks, known as deoxyribonucleoside triphosphates, to the growing chain.
Mastering the concept of the initiation complex is essential for understanding how scientists control biochemical reactions in vitro. By carefully designing the synthetic primer, researchers dictate exactly where the polymerase begins its work, ensuring that only the target region is analyzed. This precise orchestration of molecular components is what makes reliable DNA Sequencing possible, allowing the systematic readout of genetic information that is vital for advanced medical and biological education.
Slide 9. Terminators in DNA Sequencing
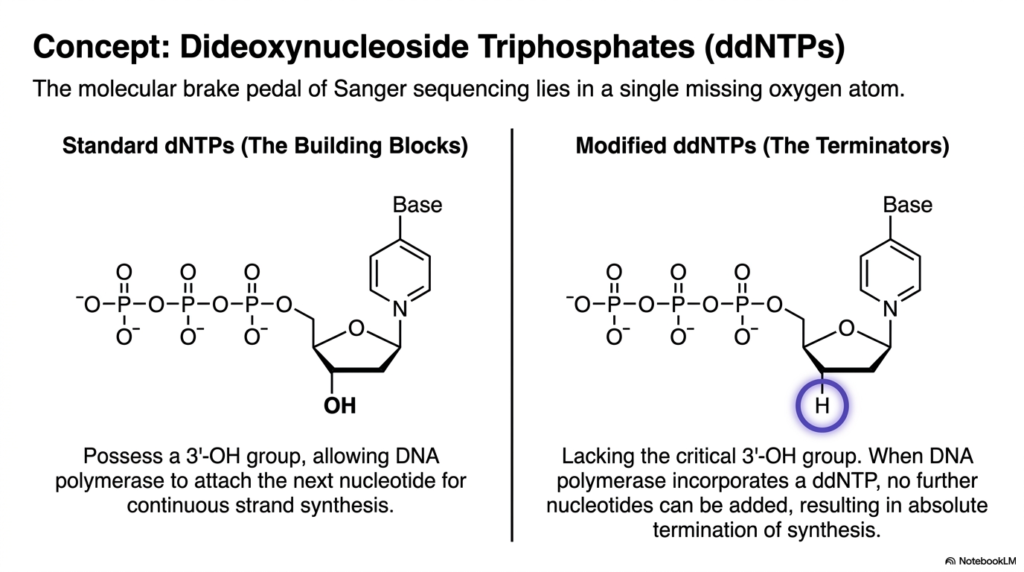
Slide nine delves into the most critical biochemical mechanism underlying the Sanger method of DNA Sequencing: the function of dideoxynucleoside triphosphates, or ddNTPs. The visual explicitly compares the molecular structure of standard building blocks against these modified terminators. This comparison highlights a minute but immensely powerful chemical difference. The entire technique relies on this specific structural modification to act as a molecular brake pedal, halting the synthesis reaction at precise, measurable moments.
On the left, the slide displays a standard deoxyribonucleoside triphosphate. The key feature of this normal molecule is the presence of a hydroxyl group located at the 3-prime position on the sugar ring. This specific chemical group is absolutely essential for standard chain elongation. It provides the necessary attachment point for the polymerase enzyme to add the next subsequent nucleotide. As long as standard molecules are incorporated, the new strand will continue to grow uninterrupted.
The right side of the visual presents the modified ddNTP, the core component of traditional DNA Sequencing. The crucial distinction is immediately apparent: the vital 3-prime hydroxyl group is missing, replaced instead by a simple hydrogen atom. This seemingly minor structural alteration has profound biochemical consequences. Because the necessary attachment point is completely absent, the polymerase enzyme is physically unable to connect another building block once a ddNTP is incorporated into the sequence.
The incorporation of this modified molecule results in the absolute and irreversible termination of strand synthesis. Understanding this specific concept is genuinely paramount for all medical and college biochemistry students. By strategically mixing these modified terminators into a reaction tube alongside standard molecules, researchers force the growing chains to stop at random, chemically defined points. This clever, targeted manipulation of molecular structure forms the essential statistical basis for accurately reading the genetic code via classical DNA Sequencing techniques.
Slide 10. Orchestrating DNA Sequencing
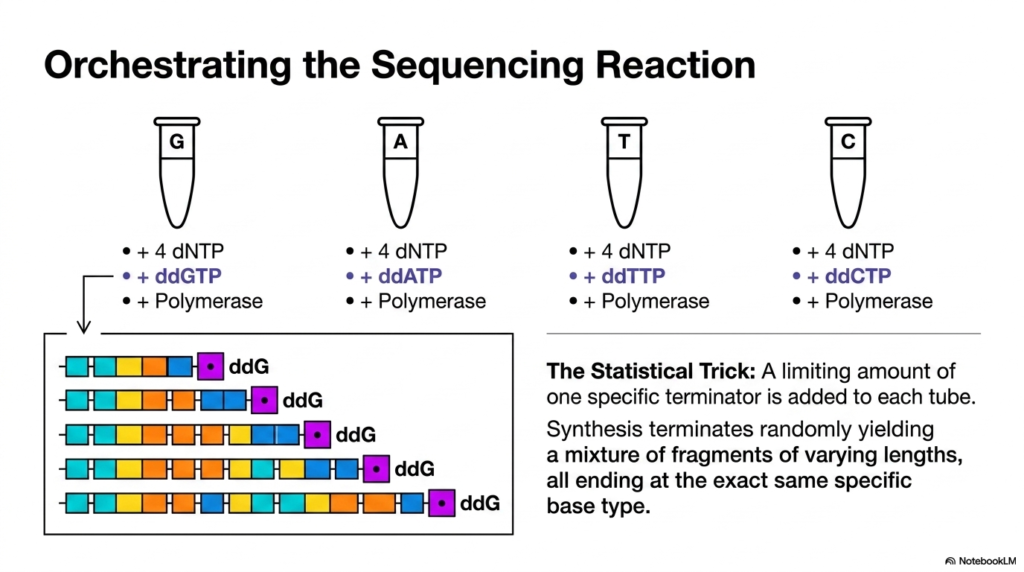
Slide ten illustrates the complex logistical setup required to orchestrate a classical DNA Sequencing readout. The visual breaks down the methodology into four separate, meticulously controlled reaction environments, represented by four test tubes labeled G, A, T, and C. This setup is necessary to decipher the complete code. Each tube contains the exact same foundational ingredients: the single-stranded template, the specifically designed synthetic primer, a full complement of the four standard building blocks, and the polymerase enzyme.
The critical difference that makes this system work lies in the addition of the terminators discussed in the previous slide. In each individual tube, researchers introduce a small, highly calculated, limiting amount of just one specific type of modified terminator molecule. For example, the first tube receives only terminators that mimic guanine, while the second receives only those mimicking adenine, and so on. This strategic distribution ensures that termination events are highly specific to each reaction vessel.
The diagram below the tubes visually represents the statistical trick that powers this method of DNA Sequencing. As the polymerase enzymes build millions of new strands simultaneously, they will randomly incorporate either a standard building block or the specific terminator present in that tube. When a terminator is incorporated, that specific chain permanently stops growing. Because the terminators are present in limiting amounts, synthesis terminates randomly across the vast population of molecules in the tube.
This calculated random termination yields a highly diverse mixture of fragments possessing varying lengths within each tube. Crucially, however, every single fragment in a given tube will strictly end at the exact same specific base type. For instance, every chain in the ‘G’ tube will definitively end with a guanine. Understanding this statistical orchestration is crucial for students, as it demonstrates how a complex biochemical mixture can be perfectly engineered to yield precise DNA Sequencing data.
Slide 11. Electrophoresis in DNA Sequencing
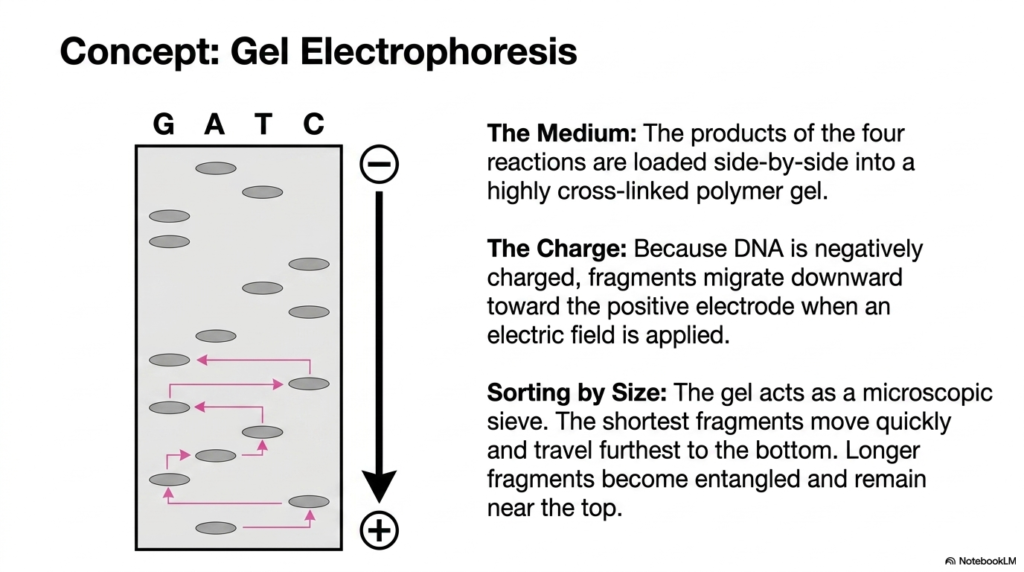
Slide eleven details the physical mechanism used to sort and analyze the complex mixtures generated during the reaction phase of DNA Sequencing. The illustration introduces the concept of gel electrophoresis, a fundamental analytical technique in molecular biology. The visual shows a rectangular slab representing a highly cross-linked polymer gel. The products from the four separate reaction tubes—G, A, T, and C—are carefully loaded side-by-side into individual lanes at the top of this specialized medium.
The primary driving force behind this separation technique is electrical charge. The chemical structure of genetic material is inherently and strongly negatively charged due to its continuous phosphate backbone. When researchers apply a powerful electric field across the polymer gel, these negatively charged fragments are naturally repelled from the negative top electrode and aggressively migrate downward toward the positive electrode at the bottom. This directional movement is an absolute requirement for successful DNA Sequencing analysis.
As the fragments migrate, the gel acts as a highly sensitive, microscopic sieve. The complex, cross-linked internal structure of the polymer physically impedes the movement of the molecules based entirely on their physical size. The shortest, most compact fragments easily navigate through the microscopic pores, moving quickly and traveling the furthest distance toward the bottom of the gel. Conversely, longer, bulkier fragments become quickly entangled in the polymer matrix, severely slowing their progress and remaining near the top.
This elegant sorting mechanism perfectly organizes the random array of fragments produced by the chain termination method. By separating the molecules precisely by length, scientists can begin to interpret the statistical data generated in the previous step. For biochemistry students, grasping the principles of gel electrophoresis is essential. It is the vital physical bridge that connects the invisible biochemical reactions occurring within the test tube to the visible, readable output required for completing DNA Sequencing.
Slide 12. Reading the DNA Sequencing Code
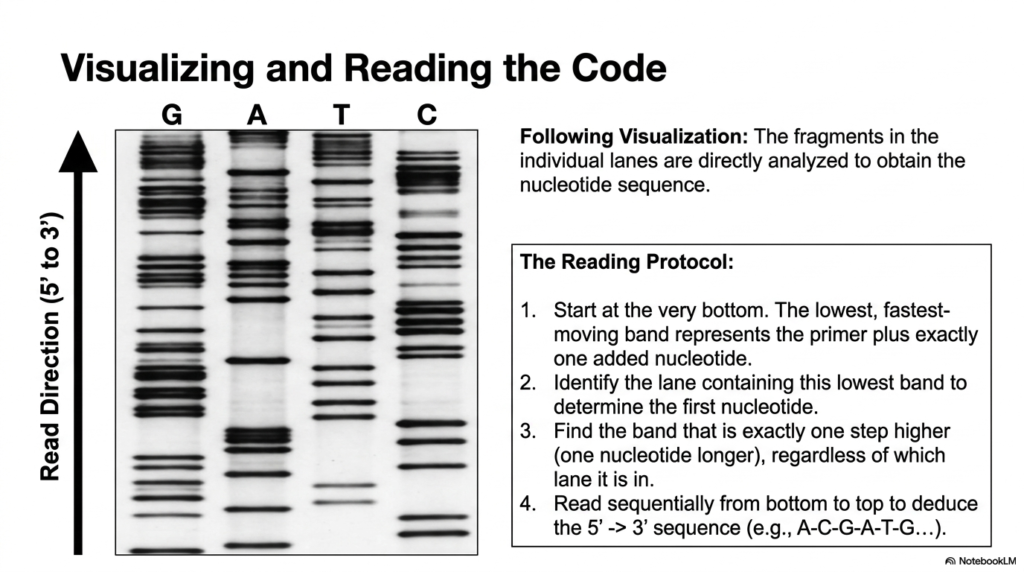
Slide twelve provides the critical guide on how to interpret the visual data generated by gel electrophoresis, representing the final manual step in classical DNA Sequencing. The image displays a realistic, high-resolution representation of an actual sequencing gel. It features four distinct vertical lanes corresponding to the G, A, T, and C termination reactions. Within these lanes, numerous horizontal dark bands are visible. Each individual band represents a massive population of identical, terminated fragments of a specific, exact length.
The text block outlines the strict reading protocol required to accurately deduce the underlying genetic code. Because the shortest fragments traveled the fastest and the furthest through the gel matrix during electrophoresis, the reading process must always start at the absolute bottom of the image. The very lowest, fastest-moving band on the entire gel represents the synthetic primer plus exactly one newly added nucleotide. Identifying which specific lane contains this lowest band dictates the first letter of the sequence.
After identifying the first base, the researcher must carefully scan upward to find the next sequential band. They must locate the band that is positioned exactly one molecular step higher, indicating a fragment that is precisely one nucleotide longer. The lane containing this next higher band reveals the identity of the second nucleotide. This meticulous, step-by-step process of reading sequentially from the bottom to the top continues until the entire visible sequence is transcribed.
By following this upward directional path, scientists construct the exact nucleotide sequence in the standard 5-prime to 3-prime direction. This manual interpretation was the foundational cornerstone of early genetics. While modern laboratories utilize automated systems, mastering this visual reading protocol remains essential for students. It perfectly illustrates the direct logical connection between molecular size, highly specific chemical termination, and the ultimate deduction of the biological blueprint through meticulous DNA Sequencing techniques.
Slide 13. Translating DNA Sequencing Results
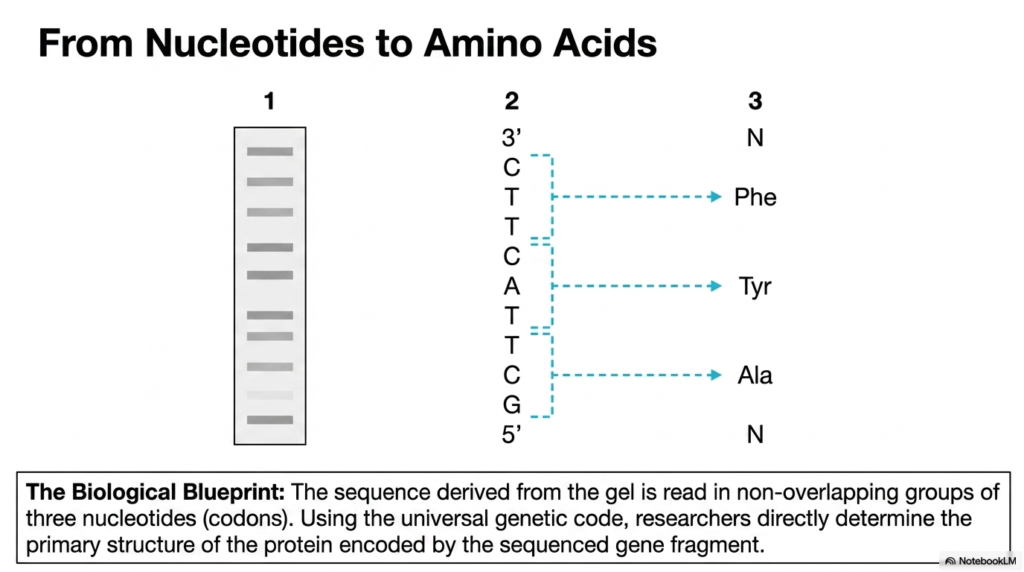
Slide thirteen explores the biological significance of the data obtained from a DNA Sequencing experiment, moving from nucleotide codes to functional cellular machinery. The visual cleanly connects a simplified representation of an electrophoresis gel on the left to an organized sequence of letters in the center, which ultimately points to specific amino acids on the right. This slide bridges the gap between raw laboratory data and the tangible primary structure of functional proteins.
Once a researcher successfully reads the sequence from the gel, they possess a string of letters representing the bases: cytosine, thymine, adenine, and guanine. However, the cellular machinery does not interpret this blueprint one letter at a time. As the text explains, the biological blueprint is naturally read in distinct, non-overlapping groups of precisely three adjacent nucleotides. These crucial three-letter groupings are scientifically referred to as codons, and they represent the fundamental words of the genetic language.
The diagram illustrates this translation process clearly. For instance, the specific nucleotide sequence ‘T-T-C’ derived directly from the DNA Sequencing readout acts as a distinct codon. Using the universally established genetic code, researchers can determine that this exact three-letter combination instructs the cellular machinery to incorporate the specific amino acid Phenylalanine (Phe) into a growing protein chain. Similarly, the subsequent codon ‘T-A-C’ specifically dictates the incorporation of the amino acid Tyrosine (Tyr).
By systematically translating these codons in sequence, scientists can accurately predict the entire primary structure of the protein encoded by the original isolated gene fragment. This predictive capability highlights the profound power of DNA Sequencing. For medical students, understanding this direct translation from molecular blueprint to functional protein sequence is vital. It forms the biochemical basis for understanding how genetic mutations at the fundamental nucleotide level can radically alter protein structure and ultimately cause complex systemic human diseases.
Slide 14. Modern Advancements in DNA Sequencing
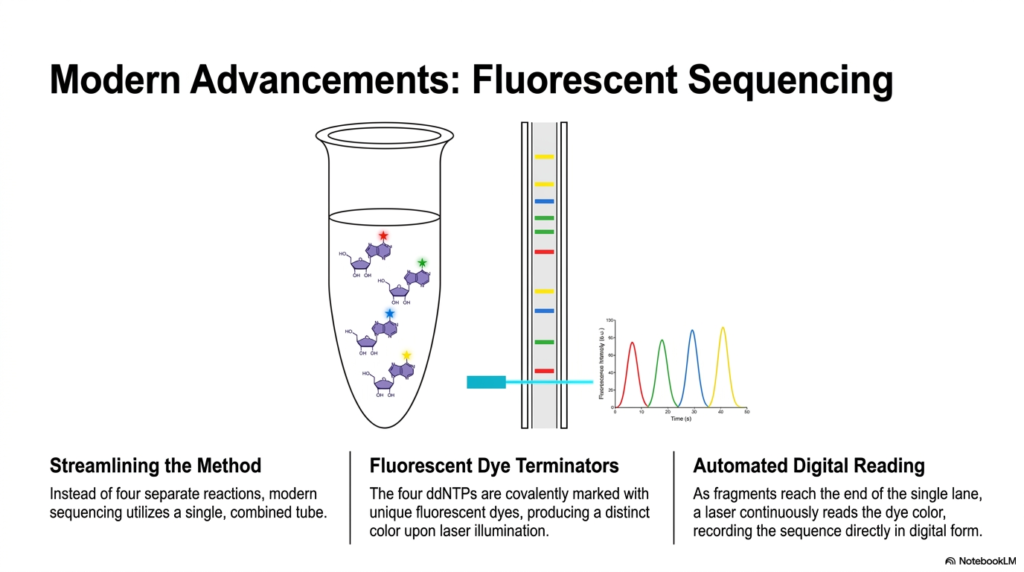
Slide fourteen shifts focus from historical methodologies to the modern advancements that have revolutionized contemporary DNA Sequencing. The illustration highlights a major leap in laboratory efficiency and data processing: the transition to fluorescent sequencing. Instead of managing four separate, cumbersome reaction tubes and navigating complex radioactive gels, modern techniques dramatically streamline the entire workflow. The visual depicts a single, combined reaction tube housing all necessary components, alongside a simplified capillary tube and a colorful digital readout graph.
The core biochemical innovation enabling this streamlined method lies in the modification of the terminators. In modern automated systems, the four different modified terminators are no longer simply missing a chemical group; they are each covalently marked with unique, specifically chosen fluorescent dyes. As the diagram illustrates with tiny colored stars, each type of terminating base is linked to a distinct color. This clever biochemical tagging eliminates the need for physically separate spatial reactions.
Because each terminator possesses its own unique fluorescent signature, all four reactions can occur simultaneously within a single, unified environment. Following the synthesis phase, the resulting mixture of varied fragments is separated by size, typically within a highly thin capillary tube rather than a large slab gel. As these fragments reach the end of this single analytical lane, an automated digital reading system takes over, utilizing a precise laser to continuously illuminate the passing molecules.
The laser specifically excites the fluorescent dyes attached to the terminators, producing distinct colored flashes. A sophisticated digital sensor records these specific colors and their sequence, immediately generating the beautiful peak diagram shown on the right. This automated process drastically increases speed, safety, and accuracy. For students entering modern research or clinical environments, understanding how fluorescent dye terminators revolutionized DNA Sequencing is absolutely vital, as this highly automated approach forms the backbone of contemporary genomic diagnostics and expansive biological research.
Slide 15. The DNA Sequencing Toolkit
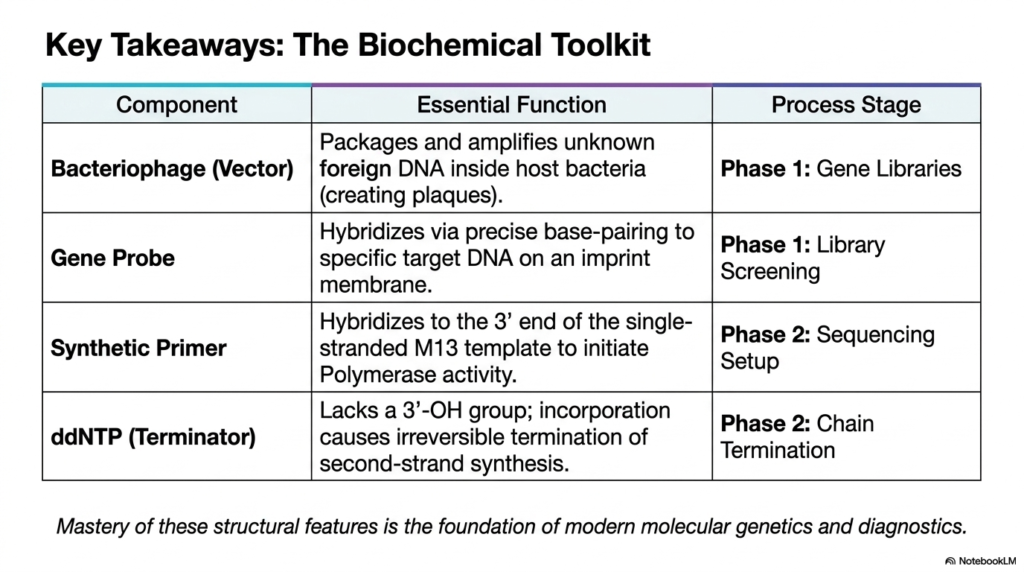
The final slide serves as a comprehensive summary, organizing the essential molecular components involved in DNA Sequencing into a clear, easily digestible toolkit table. This organized review is incredibly valuable for biochemistry students, reinforcing how individual biochemical tools function collaboratively across different phases of the workflow. The table is structured to highlight four primary components: the Bacteriophage vector, the Gene Probe, the Synthetic Primer, and the crucial ddNTP terminator molecule.
The first row reviews the Bacteriophage, identifying its essential function as the biological vehicle that packages and amplifies the unknown foreign genetic material inside host bacteria. This amplification is definitively linked to Phase 1, the creation and management of Gene Libraries. Moving down, the Gene Probe is defined by its ability to hybridize via highly precise base-pairing to specific target sequences on an imprint membrane. This action is the cornerstone of the Library Screening stage within Phase 1.
Transitioning to the second phase of DNA Sequencing, the table highlights the Synthetic Primer. Its essential function is to hybridize accurately to the 3-prime end of the carefully prepared single-stranded template, effectively initiating the necessary polymerase activity. Finally, the toolkit summarizes the modified terminator molecule. The table clearly states its structural defining feature—lacking a crucial 3-prime hydroxyl group—and its resulting function, causing the completely irreversible termination of the second-strand synthesis during the final reaction stage.
As the concluding text emphasizes, true mastery of these structural features and their highly specific biochemical functions is the absolute foundation of modern molecular genetics. By understanding this toolkit, students are well-prepared to tackle advanced topics in genomic diagnostics and specialized medical treatments. This final review solidifies the concepts presented throughout the deck, ensuring a robust and comprehensive understanding of the complex, yet elegantly designed, procedures that make accurate and reliable DNA Sequencing a reality in today’s advanced laboratory environments.
Please read our Content Disclaimer Statement.
Check out our social media channels: